Okay so today thanks to this wonderful online thing called Twitter... I was able to follow a new artist who not only caught my attention for her wonderful and creative abilities but later just prior to finishing up my short but happy visit to her blog, I found she is a very generous artist who shares how she makes some of her beautiful things with all the rest of the crafters of the World.
Why did I not stumble upon her site sooner. Thanks to Cindy Lietz the Polymer Clay Tutor ( Web: http://www.beadsandbeading.com Twitter: http://twitter.com/PolymerClayTips ) and her Tweet about Tina Holden ( Web: http://www.beadcomber.ca Twitter: http://twitter.com/Tinaholden1 )I found her. Thanks once again Cindy!
In this tutorial Tina used a small CD to create a wonderful decorative stand for her crystal ball. You could use this stand for candles, incense, or just to display anything you wish to. Its beautiful and a wonderful way to use up those old CDS and DVDs you have no use for anymore. If you are thinking that you can not bake CD's in your oven, think again....at the low manufactured recommended temperatures that are in place for Polymer Clay you can cover a CD and bake it without issues. To top it off there are lots of things you can use feet for and using her method while not uniquely her own as I have seen it used many times before, her tutorial shows you in a nice easy to understand and see way she gets hers done. Enjoy!!!!
Polymer Clay Bytes! - Tina Holden's Beadcomber: Polymer Clay Box or Tile Legs Tutorial
Cre8ively Yours
Andrea "Cre8"
Tuesday, June 30, 2009
Sunday, June 28, 2009
The First Search Engine of Artists Who Blog!

I found this through another artist's blog I now follow. I thought it as a nice way to get a link back to your blog. The more "relevant" links you have pointing back to your blog or website the better you will do when being placed in the search engines. The more sites and blogs you have linked to yours the better page rank you will get. The better your page rank, the better chance of being listed towards the top of the search engines and without having to pay for clicks.
Check it out and Enjoy!
Cre8ively Yours
Andrea "Cre8"
Alumilite - Products - Silicone Rubber - Amazing Mold Putty
Alumilite - Products - Silicone Rubber - Amazing Mold Putty
When making molds of items you wish to create over and over again, there are many products out to help do the job. Which ones to choose. You can make these molds and bake them in the oven up to 600 degrees some of them. RTV molds. Room Temperature Release molds as they are. Alley Goop, Amazing Mold Putty, Marine grade silicon putty, there are quite a few.
In addition the video about also has links to other related videos. Some of the videos are related to polymer clay and or resin while some are just related to silicone Rubber. Enjoy looking through them as there is one from Eugena Topina of www.eugenascreations.com, she has 12 (Twelve) FREE project tutorials on her website http://www.eugenascreations.com/polymer-clay-tutorials.html.
Cre8ively Yours
Andrea "Cre8"
Friday, June 19, 2009
Clay and Pasta Machine Sales
Michael's Crafts has clay on sale 4 for $5.00 again
It was not advertised. I heard it does not include Premo only Sculpey but I am not sure all stores are doing that or not.
Also www.polymerclaysuperstore.com is having a 1/2 off ] Sale on Studio by Sculpey clay!
Joann's Fabrics, today through tomorrow all Fimo polymer clay 50% off, also, Amco's clay conditioning tool (pasta machine) is only 9.99, usually 25 bucks +.
Cre8ively Yours
Andrea "Cre8"
50% Joann Coupon
50% Joann Coupon
Enjoy 50% off any one regular priced* item at your local Joann's. Valid Friday, June 19, 2009 through Saturday, June 20, 2009
Enjoy 50% off any one regular priced* item at your local Joann's. Valid Friday, June 19, 2009 through Saturday, June 20, 2009
Beading information, Jewelry Making Resources, Charts and Advice
I had to blog about Fire Mountain Gems and Beads. They have been in business since 1973 and I have never heard a bad thing about them. I can't wait for the economy to pick up and or the sales of my beads and such so I can make a nice order. Needless to say I will be making even a small order as there are just some things you wont be able to find anywhere else. I can also say that the prices are great.
Now in addition to all this, please note that I am not an affiliate or representative of or for Fire Mountain Gems and Beads and no exchange of anything including but not limited to free product, money, exchange of links or anything exchanged for my posting this. I just think its a wonderful way to shop online and you can find anything you could want or need for making jewelry.
Here is a wonderful resource put together by them that can help you with so many things. If your just starting out making jewelery you will be happy to know there is one place you can go to have all those little questions answered. They have the charts and tools to help you plan your jewelry designs.
In addition you can find out more about beading as a business, what to expect from the shows, where some of their exotic beads come from, and a Beading Dictionary where you can find out more about the different components used for making jewelry and allot more.
Beading information, Jewelry Making Resources, Charts and Advice
The link to the main website is:
http://www.firemountaingems.com/
Cre8ively Yours
Andrea "Cre8"
Friday, June 12, 2009
What Is On My Craft Work-Table

Currently I am working on a few things that has been keeping me grounded. Anyone who knows crafts and hobbies can tell you having something you love to do can really help take your mind off things in the real world, and definitely can help you to relax.
I get the most of my relief from stress by crafting and working with polymer clay. I never knew such joy in my creativity than with polymer clay and now I am addicted to bending and twisting wire.
The jewelry I have been creating is beautiful and I now dress in style, everyone wants to know where did I get that? I am happy to tell them I made them myself, my husband is quick to tell them I made it and I couldn't be happier with my artistic abilities than I am when I am wire wrapping my polymer clay beads and making wearable art everyone seems to love.
Its a wonderful feeling to know my husband thinks so much of my creations that he finds ways to play with my jewelry while were out in public so that he basically is pointing things out to others when he is doing it. Just last night at a restaurant when the waitress was taking our order he grabbed my hand and started to play with my chunky square rose bead ring that I wire wrapped with copper wire to fasten it as a wearable design I could comfortably wear on my middle finger (The fattest one on my left hand).

The waitress complimented the ring and asked me how I was able to make those flowers in the glass like that. I felt so good telling her it was not glass but polymer clay. She was amazed and said she would certainly wear that. It would have ended up a nice tip for her but in these time money pays bills not nice jewelry and I love my ring and really did not want to part with it, not just yet anyway.
Wire wrapped polymer clay beads made from rose cane slices from the very 1st real flower cane I ever made from taking a class taught to me by Jane Zhao http://www.janezhaoarts.com/ .
The green gem was one I found with a few others inside a Chinese Bamboo plant I purchased for hubby for Valentines day. Apparently they put in a handful of these cut glass looking gems in with other stones to make a drainage system for the plant inside a decorative planter. They were pre-drilled with holes in them when I fished them out of the planer so I was able to wire wrap it with ease. The results are a beautiful focal piece to be worn with my other polymer clay beads, wire cage beads, metal chains, cord, black satin ribbon, pearl strand or anything else that just might go with it as it appears that just about everything would look great with it.

I made some pillow beads which are more squared then puffed like a pillow but I did make some puffed pillow beads that are a bit smaller so I wanted these shown above to look more squared and less pillow like. I wired them with copper wire and joined them all with copper jump rings I made myself.
I don't have the package to the copper wire I had used so I am not sure of the exact gauge wire it was, but I can tell you that it was soft and I feel the jewelry looks good but not everything you see would be as sturdy pieces as I would have liked for them to be. I know if I wear them I will be very careful, but I know for future pieces I create I will use stronger wire that is less likely to come undone on you.
Additionally I have made the altered book you see. The cover of the book was tiled using polymer clay tiles I created from scrap clay and Dap Dynaflex230 Window and Door Molding Premium Elastometric Latex Sealant (Caulking) in Brilliant White for the grout. The lettering are tiny letters sold for decorating fingernails. Then the whole thing was coated with Mod Podge Gloss - Lustre. The center was left untiled and I painted it with copper acrylic paint and bordered with real copper wires cut to size. The inside of the book is not complete.
Little baby is for the Miniature Collectors Club monthly on-going challenge for June.
Little baby is for the Miniature Collectors Club monthly on-going challenge for June.
Cre8ively Yours
Andrea "Cre8"
Steampunk Wallpaper - FREE Desktop Wallpaper
Not exactly a craft but certainly art. Wonderful for your computers wallpaper if you love steampunk like I do you will enjoy these FREE wallpapers you can appreciate anytime offline or online.
Steampunk Wallpaper
Enjoy!!!
Cre8ively Yours
Andrea "Cre8"
Steampunk Wallpaper
Enjoy!!!
Cre8ively Yours
Andrea "Cre8"
Gizmodo - Steampunk Jewelry Is Perfect If You Are Captain Nemo - Gadgets
Gizmodo - Steampunk Jewelry Is Perfect If You Are Captain Nemo - Gadgets
Need I say more...its totally steampunk and wearable art at its weirdest but I like it!!!
What do you think about this kind of wearable art?
Cre8ively Yours
Andrea "Cre8"
Need I say more...its totally steampunk and wearable art at its weirdest but I like it!!!
What do you think about this kind of wearable art?
Cre8ively Yours
Andrea "Cre8"
5 DIY Steampunk conversions | Design Tavern

Okay so now I am back on Steampunk and off chenille stemmed pipe cleaners for now anyway LOL
I saw this and had to share. Not just for the art and the cool conversion but a few other neat steampunk things that are just fabu (fabulous) right where I found this from. I mean if this page from Design Tavern does not give you the whole steampunk feeling and inspiration you need to try and create or convert something of your own I don't know what else can.
I saw this and had to share. Not just for the art and the cool conversion but a few other neat steampunk things that are just fabu (fabulous) right where I found this from. I mean if this page from Design Tavern does not give you the whole steampunk feeling and inspiration you need to try and create or convert something of your own I don't know what else can.
I have certainly been bit by the steampunk bug. I have 3 sketches of things I wish to try and create.
5 DIY Steampunk conversions Design Tavern
Cre8ively Yours
Andrea "Cre8"
5 DIY Steampunk conversions Design Tavern
Cre8ively Yours
Andrea "Cre8"
Rock Crafts

Its Spring and were heading right into Summer, so why not go out and collect some rocks. This looked like a great craft you can do with the kids, for parties or just to give as gifts. I have a small sack of Akasha Crystals River Rocks and I thought now here is something I can do with these.
Paper Weights
Messages of Inspiration or Good Fortune:
Strength
Hope
Courage
Faith
Luck
Love
Charm
Wisdom
Fertility
Money Rock
Pet Rocks
I did an art show once to sell table top fountains and the tables were nicely displayed with table cloths that kept wanting to fly up and lift away with what was a very windy day. I would have loved to have had some nice river rocks painted to look like animals which would have went nicely with the display. I could see some koi fish and rocks with pond lilies and or orchids on them.
Rock Crafts and more creative crafts projects, templates, tips, clip-art, patterns, and ideas on marthastewart.com
Cre8ively Yours
Andrea "Cre8"
Making Figures: Reindeer

It just was not enough to have the 3 previous posts on creating with pipe cleaners AKA chenille stems ...going with the same Christmas theme here is yet another animal you can create, keeping with the Christmas theme. These are adorable, but don't just think of them for Christmas... I see also horses, donkey, moose, dogs, etc... not just for Christmas, use them for other occasions as well. Making Figures: Reindeer
But picture this...your dollhouse needs to be decorated for the Christmas holiday, why not a few reindeer out on the front lawn or up on top of the house pulling Santa's sleigh.
Cre8ively Yours
Andrea "Cre8"
Pipe Cleaner Creatures
Okay okay so I am on a pipe cleaner kick!
 I just couldn't help myself I saw these and thought well they are cute, crafty, great for a nice project with the kids. Seem to be a clean craft as well. Not the mention the possibilities for miniatures. Just remember the thin pipe cleaners will enable you to create smaller items than those being shown in these tutorials from Martha Stewart website. I can see a tiny tank made from a blister pack and a little chameleon inside. Or a nice backyard scene or decorating around your miniature tree with one of those cute deer that look like Bambi. Have a miniature monkey for a circus room box or how about a kids party scene.
 I just couldn't help myself I saw these and thought well they are cute, crafty, great for a nice project with the kids. Seem to be a clean craft as well. Not the mention the possibilities for miniatures. Just remember the thin pipe cleaners will enable you to create smaller items than those being shown in these tutorials from Martha Stewart website. I can see a tiny tank made from a blister pack and a little chameleon inside. Or a nice backyard scene or decorating around your miniature tree with one of those cute deer that look like Bambi. Have a miniature monkey for a circus room box or how about a kids party scene.
Cre8ively Yours
Andrea "Cre8"
Pipe Cleaner Ornaments and more creative crafts projects, templates, tips, clip-art, patterns, and ideas on marthastewart.com
In addition to the previous post from me from Martha Stewart for making wonderful miniature Christmas trees from chenille stemmed pipe cleaners, I have a video from her showing how to make some larger size ornaments for your holiday trees. Go ahead and try to adapt them to the smaller scale to use to decorate the tree if you make one from the instructions provided in the post prior to this one. Remember you can use the thin pipe cleaners for making smaller items.
Pipe Cleaner Ornaments and more creative crafts projects, templates, tips, clip-art, patterns, and ideas on marthastewart.com
Pipe Cleaner Ornaments and more creative crafts projects, templates, tips, clip-art, patterns, and ideas on marthastewart.com
Pipe Cleaner Decorations: Christmas Tree and more holiday recipes, crafts projects, decorating tips, gift ideas, and simple solutions on marthastewart.com

Pipe Cleaner Decorations: Christmas Tree and more holiday recipes, crafts projects, decorating tips, gift ideas, and simple solutions on marthastewart.com
Martha does it again with a wonderful craft DIY that's perfect for us miniature lovers. These fantastic realistic faux Douglas firs would make great Christmas Trees for your dolls house and or miniature roombox scene. Its amazing what some chenille stemmed pipe cleaners can become. I can see some scented with essential oils that smell like real pine trees.
Cut out a circle of red scrap fabric or felt for a skirt, and wrap tiny blocks of wood with additional green and red chenille stemmed pipe cleaners for bows. You can find the smaller stem pipe cleaners for the bows on the gifts and the candy canes on the tree or make ornaments from Fimo, Sculpey, Premo, Kato, Cernit, Polymer Clay or Air Dry Clay and create tiny balls and other ornaments for your tree from beads.
A fun project if you make one and use it anywhere I would love to see what you have done with yours, how you have decorated it, etc..
Cre8ively Yours
Andrea "Cre8"
Monday, June 8, 2009
More Steampunk- Sir Edmund Meowlary by dlsarmywife

I saw him and just had to share. Just another example of art meets steampunk style.
Deborah is an Army Wife and Mother of 3 Boys. She is a proud crafter who has a passion for polymer clay and her whimsical style and fantastic fantasy sculptures of dragons are very nice affordable gifts for just about any occasion. Dragon lovers would love to own one of these cute little ones.
Handmade Accessories on Etsy - Sir Edmund Meowlary by dlsarmywife
To see more from Deborah or to follow her on her blog click here: http://www.dlsarmywife.blogspot.com/
Cre8ively Yours
Andea "Cre8"
Steampunk Industrial Hearts & FREE ADDING SCENTS TO POLYMER CLAY TUTORIAL
I had to post about Monster Kookies since I love what she does with clay and I just posted here in my blog about steampunk which I love, and she makes the most wonderful little industrial hearts that are so steampunk you just have to fall in love with them if you love this style of art. She also creates the sweetest treats to wear, all handmade with her own style, very shiny and colorful. Check her out don't be afraid to tell her you found out about her here on my blog.
Future Passed - Front by *monsterkookies on deviantART
FREE TUTORIAL - ADD SCENTS TO POLYMER CLAY
She has a nice tutorial on adding scents to your polymer clay. Its common scents oops sense, "LOL" to me that you have to use oil because polymer clay is oil based, but there are some great tips and it would not hurt to try her method and if you use it give her credit for having used her online tutorial.
Monster Kookies - Custom Handcrafted Polymer Clay Jewellery!
What Makes it Tick? An Oddity of Tiny Steampunk Facination
Odd Fae does it again with a beautiful time piece pocket watch where she encased one of her little odd polymer clay sculpted creations within. He wears a clock sprocket over his heart, and his goggles are made from tiny brass tubing and clock parts. The eyes are made of onyx, and she uses the finest to give it color and make this tiny one almost seem to be alive inside.
Steampunk Oddfae by ~oddfae on deviantART
I am in love with steampunk and yesterday while in Michael's Crafts I noticed many things now that are for the style. From clock parts to golden wings, keys and locks, springs and sprockets. Even beautiful focal beads and charms all that would make great past time pieces. Many aged bronze and copper items that just fit. Look for more on this steampunk stuff from me, I love it
Cre8ively Yours
Andrea "Cre8"
Printable Craft Store Coupons
This is a wonderful way to get those printable coupons online when you did not get the paper.
I had a very hard time finding anything for Michaels on their website but certainly had not problems whatsoever getting them from this website. Not this week though. Michael's Crafts (in my local area anyway) did not put out a sales circular thus no coupons. However I signed up on the Michaels website for their newsletter and advertised specials announcements in my email, they sent me a link to a 50% off any one non sale item. I printed out 4 of them but could have printed out many more, and they are good until June 21st.
But this blog will give you coupons for your favorite/local craft stores. JoAnne's Fabrics and Crafts, Michael's Crafts, AC Moore, Hobby Lobby...
GET THEM HERE
In case the above text link does not work the address to your printable craft store coupons is as follows:
http://www.mycraftcoupons.com/2009/06/50-printable-ac-moore-coupon.html
Cre8ively Yours
Andrea "Cre8"
Wednesday, June 3, 2009
Color Scheme Designer - A FREE Cool Online Tool

I love twitter I keep founding all these cool things thanks to those who tweet about them
This time I wish to share a neat online tool you can use to help with all those times when you wish to choose color schemes for just about anything. I am sure it was created with webpage designing in mind but you sure could use it to choose colors for beaded jewelry, polymer clay creations, dressing dolls, applying makeup, scrapbooking, paper quilling, designing a room or room box and or for anywhere you may need to choose colors that compliment one another and thus look good together.
From warm colors to cold colors and anything in-between. Check out the mono colors, colors that compliment, triad of colors, tetrad of colors, analogical and accented analogical. The possibilities are endless now and you can have an online helper whenever you need it and not worry about taking up anymore space in your craft area.
Check it out: http://colorschemedesigner.com/ and don't forget to bookmark it so you can use it when you need it.
Wire Cage Bead Tutorial - Jewelery

Today I wanted to quickly blog about a neat tutorial I just now got tweeted to me on twitter. It looks really nice and extremely easy. I do not make jewelry although lately I have been tampering a bit because I do make polymer clay beads. I would love to be able to make other types of beads that would compliment the clay beads and bobbles in a nice arrangement where they can be worn as earrings, charms, necklaces, bracelets, anklets, cell phone charms, barrette charms, sunglass buddies(tm) and other wearable dangles.
I have some copper wire which I picked up at my local Home Depot in the plumbing section, so when I saw this tutorial just now I got a hankering for making some wire cage beads. What about you? Go ahead give it a try. If you don't have copper wire it okay to use any wire you may have on hand. I myself may try with some floral wire about the same gauge and just test it out and see if I can get the same or similar twisting results.
CLICK HERE FOR TUTORIAL:
Cre8ively Yours
Andrea "Cre8"
Image of wire cage bead above property of www.turtlebayjewelry.com from the tutorial posted as the completed peice you will be creating.
Monday, June 1, 2009
How To View, Share And Operate YouTube Video Players
Well it has come to my attention that many people still may not know how to use the embedded video players that are posted in many blogs and websites. Many of these embedded players will also give you the option to view other videos like the one originally intended for you to watch when it was posted. They will also enable you to use and post those same videos on your blogs and websites by providing you with a unique code to either embed the video right into your sites designed pages, message/forum posts or as an added blog gadget. Additionally you can link to the video without having to post it anywhere. There is an URL link provided which when shared will take anyone who clicks on it to the video itself where it is most likely hosted (YouTube, Google Videos, etc.).
 Play video. You can click on it from the very center of the video as shown in the image above or from the very bottom of the player (1st uon the extream far left bottom corner). Clicking on this button again from the bottom player controls will pause the player, replacing the icon with the II symbol,
  stopping the video from playing video or sound until pressed again to resume play. The are in the center gauges the minutes and seconds into the video as it plays so if you like you can always get back to that part of the video without having to view it from the beginning should you have watched it before and then had been interrupted for any reason. You may also wish to blog about the video and make reference to a part or parts of the video that should be looked at closer. You can drag that button with the dot inside of it up or down the scale to the exact seconds and minutes into the video you wish to see.
 This button will bring up the volume control and allow you to either to turn the volume of the video thats playing either up or down. Clicking on it will automatically mute the volume.
This button brings up more options. This is where you can bring up the code to embed this video into your own blog, website, MySpace, FaceBook, forum post etc.. Additionally there may be options available where you can annotate and add (CC) captions/comments to the video being played.
 Once selected it will be be highlighted shown here in red. *Note some monitors may show slightly different colors. This icon image shows
 the additional content icon which if you click on it you will see additional videos by the posted video' creator and or the videos that are also contained in that channel. Sometimes there are like videos being shown while at times you may see content that is not relevant or of interest to you.
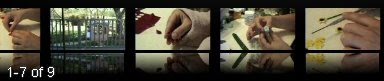
Here are some samples of videos that were shown in the video player once I selected the more content icon. I could scroll through to see the other 2 of the 9 not being shown. *Note there is only so much room these players can open to show. While you can choose the size of the player in some instances this is the default size as it will be shown to most viewers no matter what browser they are using.
Top right corner will show the Embed code to add the video player showing the video you just saw to your blog, networking friends site profile, forum message and comment posts.
The URL is the web address to share the video you just saw with others. When there is no need to post the video but you still wish to share it with others, you can select this web address and copy it to paste it into your email, blog, instant messenger or text message on your cellular phone.
Here is how it works:
Every YouTube video player has controls under where you view the video being shown. There are a number of buttons with icons on them, each one performing a different function. *Please note some button options do not always have all functions available.
 Play video. You can click on it from the very center of the video as shown in the image above or from the very bottom of the player (1st uon the extream far left bottom corner). Clicking on this button again from the bottom player controls will pause the player, replacing the icon with the II symbol,
  stopping the video from playing video or sound until pressed again to resume play. The are in the center gauges the minutes and seconds into the video as it plays so if you like you can always get back to that part of the video without having to view it from the beginning should you have watched it before and then had been interrupted for any reason. You may also wish to blog about the video and make reference to a part or parts of the video that should be looked at closer. You can drag that button with the dot inside of it up or down the scale to the exact seconds and minutes into the video you wish to see.
The image up above this one shows the seconds/minutes shown on the scale along with the faded red area showing how far the video has played to that point. This feature shows the total amount of minutes of this video which is 9:58 which is equal to 9 Minutes and 58 Seconds.
 This button will bring up the volume control and allow you to either to turn the volume of the video thats playing either up or down. Clicking on it will automatically mute the volume.
This button brings up more options. This is where you can bring up the code to embed this video into your own blog, website, MySpace, FaceBook, forum post etc.. Additionally there may be options available where you can annotate and add (CC) captions/comments to the video being played.
 Once selected it will be be highlighted shown here in red. *Note some monitors may show slightly different colors. This icon image shows
 the additional content icon which if you click on it you will see additional videos by the posted video' creator and or the videos that are also contained in that channel. Sometimes there are like videos being shown while at times you may see content that is not relevant or of interest to you.
Here are some samples of videos that were shown in the video player once I selected the more content icon. I could scroll through to see the other 2 of the 9 not being shown. *Note there is only so much room these players can open to show. While you can choose the size of the player in some instances this is the default size as it will be shown to most viewers no matter what browser they are using.
Top right corner will show the
Embed code to add the video player showing the video you just saw to your blog, networking friends site profile, forum message and comment posts.
The URL is the web address to share the video you just saw with others. When there is no need to post the video but you still wish to share it with others, you can select this web address and copy it to paste it into your email, blog, instant messenger or text message on your cellular phone.
The above two codes should always be made available to you from YouTube and or the other video hosting website so you can share them wherever you should choose.
So now you know how to use the Videos being posted on my website and blog and many others.
Also don't forget that as a registered user of YouTube and or Google/YouTube (you can use your Google ID/Email to sign into YouTube), you can add these videos and any others you find to your playlist and be sure to share it with others. This is what I do and why you can see all the video tutorials I have added to my public playlists from on my website at http://tinycrafts.com/videotuts.html. I am always updating my playlist so bookmark it and come back often.
Cre8ively Yours
Andrea "Cre8"
MCC Yahoo Group - May Calendar Baby Challenge
 1:12 Scale Dollhouse Miniature Doll by Andrea Renee "Cre8" http://www.tinycrafts.com/
Starting this month (May 2009) some of the members of one of the most wonderful groups (Miniature Collectors Club) on yahoo have participated in a group challenge. A challenge is not a contest to win anything or rein the best of any one other miniaturist artesian, but to challenge ones own abilities as an artist and creator to create from your own imagination and test your limits based on a theme. This challenge is bases on a month to month challenge of ones self to complete a calendar baby using the free tutorial provided by Penny Dolls.
This is the 3rd baby I created before I was happy with what I submitted। It certainly was a challenge। The 1st one I made weeks ago burned in the oven when I was baking her while working. Yes I have the pleasure of being able to do some things while working since I do work at home, but if you can not pay attention to what is in the oven then you should not be baking. The outcome is not pleasant. Polymer clay releases fumes they say are toxic more so when burned. Besides I can tell you the the tiny AA and Latino children I have been creating have been interesting test subjects. Each one in itself a test of my patience and tolerance for this craft. I love clay its forgiving in many ways and or you can take something and make a happy accident from it...but once bakes it is what it is.
The chair is a metal and wire chair from an old handed down dollhouse with accessories from the 1960's I made the seat cushion from polymer clay, and the table is the match to the same chair which I covered with lemon yellow piece of tissue paper I cut a circle from large enough to cover the table and the legs all the way around। Everything else is polymer clay made by me। The doll is polymer clay made over aluminum foil and toothpicks with slight adjustments made to the tutorial provided by Penny Dolls, as the 1" cone body as instructed would yield a play scale baby or slightly larger baby. The fork was added to the molded open hand after baking as it is made of plastic. The babies tiny earrings are 1/2mm no hole beads. The lips were painted using a rose red acrylic paint and applied with a sharp tipped toothpick. Mod Podge Gloss Luster was used to highlight certain parts of the baby like the eyes, the earrings, strawberries on her teeny little dress, her sandals, the cake plate, the cake platter, the birthday candle and certain parts of the cake decorations as well as to highlight the custard center of the birthday cake. The birthday hat is from the burnt baby made a couple of weeks before.All was okay until I decided to try and use mohair on her and make her a little red head. So this one I made with clay hair to be safe.
I can not wait to do this months June Baby Challenge. This was fun and I have lots of ideas now and feel great when I am being creative and using my imagination. Nothing better than spending my day off going clayzie ( addiction to clay to the point where you once you start playing with it you just can't stop).
Cre8ively Yours
Andrea "Cre8"
Subscribe to:
Posts (Atom)


